Introduction
Please carefully read this guide in order to fully configure this template, and remember to test it on browsers like Chrome, Edge, Safari, or Firefox.
PLEASE NOTE that this template has been tested on a VPS server hosted on GoDaddy and AWS Lightsail, so I recommend you to use one of those hosting services, I cannot guarantee you that the files of this template will work properly on different hosting providers.
IMPORTANT: The backend of this template is the XServer API.
If you own a VPS server (on GoDaddy or other providers), you can purchase the XServer API, upload it to your own VPS server, and configure it (see the Installation and Configurations chapters of the XServer API).
In case you don’t own a VPS server (or don’t want to buy it), you can create a Free account on XServer.app, create a Database and configure it to work with this app – read the Official Documentation
In this case, you don’t need to download the SDK, it’s already included in the package of this template.
Quick Start
BEFORE uploading the php file of the Website files folder into your own server, you can either do the following:
a) Create a FREE account on XServer.app and a Database, then replace the string of the $DATABASE_PATH variable with your Database path in the XServerSDK.php file:

$DATABASE_PATH = "https://yourdomain.com/xserver/";Your website is now connected to your own database on XServer.app!
b) If you have bought the XServer API, you need to copy the path (URL) where you’ve hosted the files of the xserver folder in your VPS server (ex: https://mydomain.com/xserver) and replace the string of the $DATABASE_PATH variable in the XServerSDK.php file with your XServer’s path:
$DATABASE_PATH = "https://yourdomain.com/xserver/";Then enter the _Tables folder on your server and:
1. Delete the Users.json and Posts.json files
2. Upload the JSON files included in the Tables folder of this template’s package
Your website is now connected to your own server!
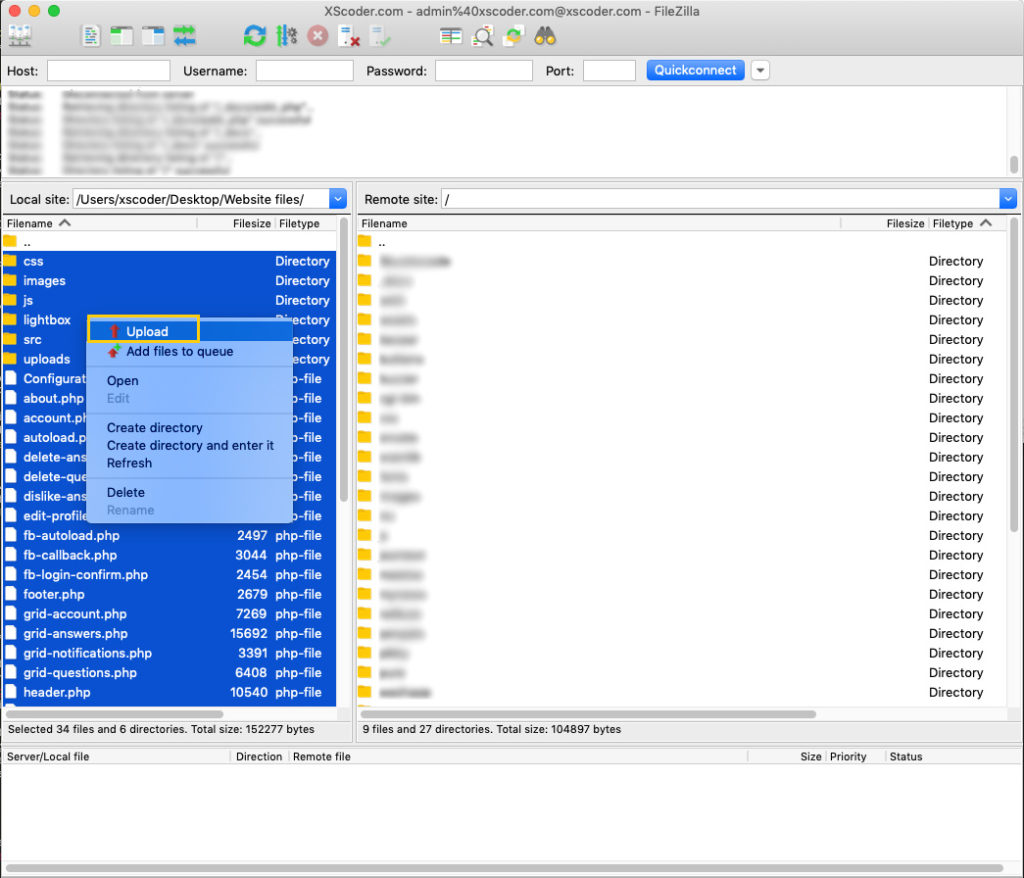
You can now upload all the files and folders from thefiles folder to your own server via an FTP client app like Filezilla. The installation of the .php files and folders into your own server is super easy, just connect Filezilla to your server, select all files contained in the Website files folder and upload them, like this example:

General
Server requirements
You must have your own domain and VPS server - get it on GoDaddy or AWS Lightsail. DO NOT USE 000webhost.com or any other free hosting websites - and make sure you have PHP enabled and updated to the 7 version or higher.
Also, you need to install the SSL Certificate and enable it in your own hosting server, usually this option comes apart from the hosting purchase. If you don’t buy and enable SSL, this website won’t work properly. So just make sure you have SSL and PHP enabled BEFORE uploading the files of the Website files folder into your own server.
If your VPS server is on AWS with Ubuntu 18.x, make sure to install the curl, apache, php and PEAR Mail.php packages. Usually, those packages are already installed on a GoDaddy’s VPS server, but not on an AWS Lightsail’s instance.
CSS style
The files folder contains the main.css file that handles the CSS layout of this template. You can find it into the css folder. Open it with your favorite text editor software and check it out.
Images
The files folder contains the img folder, where you can find the category images and other PNG images, including the favicon.png icon. Replace them as you wish, just don’t change their size and name so you won’t have to edit a single line of code to show them in your own version of this template.
Terms of Use and Privacy Policy
Open the terms-of-service.php file form the files folder and edit it accordingly to your own Terms of Service and Privacy Policy.
Delete a User’s account upon request
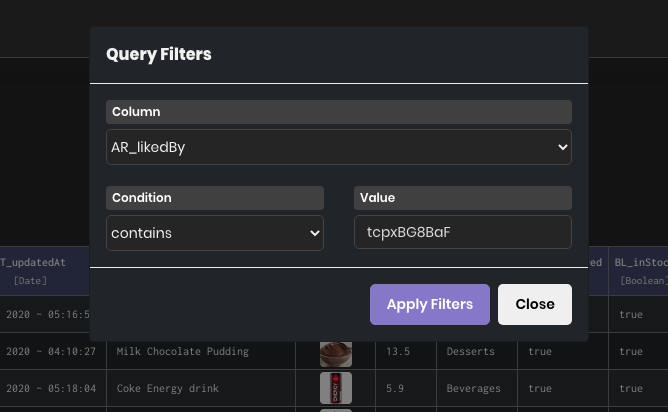
Accordingly to GDPR Terms, you have 24 hours to delete an account after receiving a deletion request. In order for you to delete an account, you first need to identify the user’s row in the Users table of your Database, keep a note of its ID_id value, select that row and click the Delete Row(s) button.
Then, just search for that ID_id value you’ve previously noted in all the other Tables of your database, check out all the rows until you’ll find that ID_id and delete it – this is in case it appears into some Array type columns.
You can use the Query function to find an ID_id in your database:
Reported content
People are allowed to report inappropriate/offensive Items, as well as block/unblock Users from the Chat.
So you should daily check your Database in order to see the columns called AR_reportedBy in the Items tables, and take action for it asap. See if they contain some ID_id of the Users (which means those users have reported the data of that row). You may delete the abusive Users rows from your database forever by selecting a cell and click Delete row(s), but please note that before deleting a user from the Users table you must note its ID_id and search for it in the other tables.
Configurations
The XServerSDK.php file
You can find this file into the files folder. Open it and keep reading this guide, you’ll have to perform some edits in this file in order to get your template ready to run:
XServer Database Path
As explained in the QuickStart paragraph, you must replace the $DATABASE_PATH string with your own database URL, either from your own XServer API or from the xserver.app website.
• Using the XServer API hosted on your own VPS server:
To install and configure the XServer API into your VPS server, please follow the Installation and Configurations chapters of its Documentation.
Once you’ll have the XServer API files ready in your own server, enter the _Tables folder and:
1. Delete the Users.json and Posts.json files
2. Upload the JSON files included in the Tables folder of this template’s package
In this way, you’ll get all the necessary Tables and columns for this app to work, without having to manually create them in the XServer’s Dashboard.
Data will be empty, so after you’ll get this app’s configurations done, you’ll be able to sign up with test Users, post items, and all the other features.
3. The package of this template contains a send-mail.php file that you must upload in the same directory where you’ve uploaded the XServer API, like this example:

• Using the XServer.app BaaS
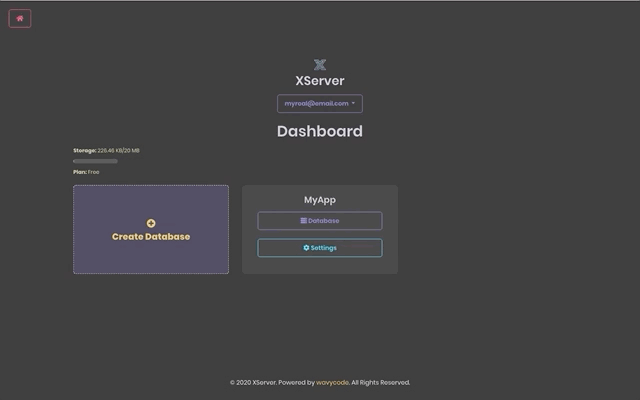
1. Create a Database, click the Settings button and click Copy Database path.
2. Import the JSON files included in the Tables folder of this template’s package in your Database:
3. Read the Dashboard -> Database Settings chapter to learn how to perform a few more settings for your Database.
- Website name
Replace the string of this variable with the name you want to give to this template:
$APP_NAME = "Bazaar";iOS App Store and Google Play Store links
If you’ve uploaded the mobile versions of this template into your own Apple and Google Stores, set their links to the following variables:
$IOS_APPSTORE_LINK = '';
$GOOGLE_PLAY_LINK = '';
Google Sign in Client ID
Replace the string below with your own Google OAuth Client ID (check the Google Sign In paragraph to learn how to create your own OAuth Client ID):
$GOOGLE_SIGNIN_KEY = ''; Share URL
Reaplce the string of this variable with the URL of your website:
$SHARE_URL = 'https://yourdomain.com/';- Currency code
Replace the string of this variable with the currency code you need for this website:
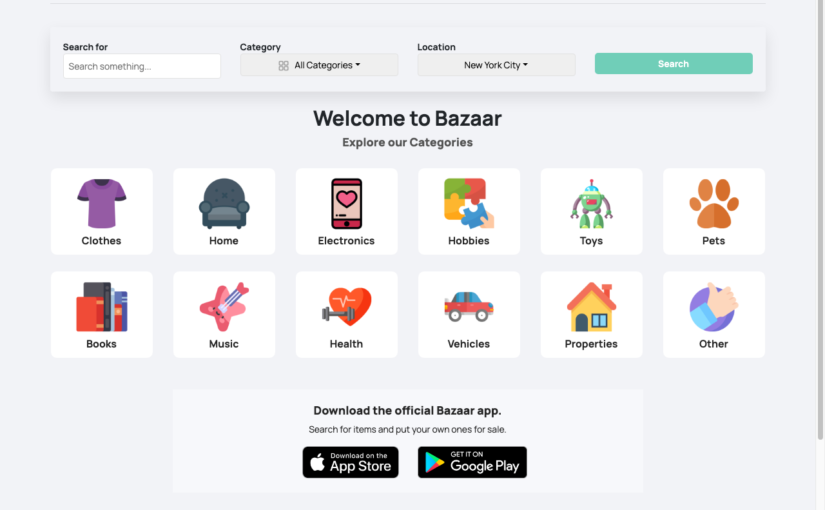
var PRICE_CURRENCY = "USD";- Array of Categories
You can edit the strings of this array as you wish - just in case you want to change category names.
Remember to rename the .png images of the img folder accordingly to the changes you’ll make in this array, and ALL LOWERCASE characters:
var categoriesList = [
    	"All Categories",  // Mandatory element, it must stay at first position
	    "Clothes",
	    "Home",
	    "Electronics",
	    "Hobbies",
	    "Toys",
	    "Pets",
	    "Books",
	    "Music",
	    "Health",
	    "Vehicles",
	    "Properties",
	    "Other",
    	// If you'll add new Categories here, remember to add their relative images in the 'img' folder too, all lowercase names
];
- Array of Cities
You can edit the strings of this array based on the cities you want to list on your website. Please note that the first element is mandatory and it’s to search for items in all cities you’ve listed:
var citiesList = [
            "All US Cities", // <-- FIRST CATEGORY THAT INCLUDES ALL LOCATIONS - MANDATORY, AND MUST STAY AT FIRST POSITION OF THIS ARRAY
	    "New York City",
	    "Chicago, Illinois",
	    "Charleston, South Carolina",
	    "Las Vegas, Nevada",
	    "Seattle, Washington",
	    "San Francisco, California",
	    "Washington, D.C.",
	    "New Orleans, Louisiana",
	    "Palm Springs, California",
	    "San Diego, California",
	    "St. Louis, Missouri",
	    "Sedona, Arizona",
	    "Honolulu, Hawaii",
	    "Miami Beach",
	    "Branson, Missouri",
	    "Boston, Massachusetts",
	    "Savannah, Georgia",
	    "Orlando, Florida",
	    "Portland, Oregon",
	    "Lahaina, Hawaii",
	    "Saint Augustine, Florida",
	    "Nashville, Tennessee",
	    "Los Angeles, California",
	    "San Antonio, Texas",
	    "Austin, Texas.",
];
Array of Listing types
There are 2 types of listing in this template:
var listingTypes = [
   "On sale",
   "Looking for"
];
Price ranges
You can edit the following array as you wish, it’s a list of price ranges that users can select in order to filter a products search:
var priceRanges = [
	    "Any price", // Mandatory element, it must stay at first position
	    "From 30",
	    "From 50",
	    "From 100",
	    "From 150",
	    "From 200",
	    "From 500",
	    "From 1000",
];
Ads
This template can show Leaderboard and Square ads, usually from (Google Ads), so you have to replace the following code with your own ads code in the PHP files that contain it:
<img src="img/ad-leaderboard.png">
<img src="img/ad-square.png">
Utility Functions
Unless you are familiar with PHP/Javascript programming, you should leave the code below this comment as it is:
/* TABLES AND COLUMNS NAMES */DO NOT EDIT those variables and instances unless you’re an experienced developer, otherwise, the app will not work properly.
XServer backend
The backend of this template is XServer, and you can either buy the XServer REST API an install it on your own VPS server, or create an account on xserver.app and a Database for this template.
After performing the configurations mentioned in this guide, you will run the website and see no content, so Sign Up with a test user in order to create a test account and start testing the app.
The FREE account on XServer.app offers 10 MB of storage and 1 Database. This allows you to create demo data and fully test this app on your side.
PLEASE NOTE that once the amount of data grows, you’ll need to subscribe to a Paid Plan, check the Pricing table on the XServer.app website.
I suggest you to start with a Basic Plan – it’ only $5/month – so you will get more Database Storage and Databases. Then, you’ll still be able to upgrade your Plan in the Pricing section in case you’ll need more Storage.
If you own a VPS server (on GoDaddy or other providers), you can purchase the XServer API, upload it to your own VPS server, and configure it (see the Installation and Configurations chapters of the XServer API).
In case you don’t own a VPS server (or don’t want to buy it), you can create a Free account on XServer.app, create a Database and configure it to work with this app – read the Official Documentation
In this case, you don’t need to download the SDK, it’s already included in the package of this template.
Google Sign In
Go to https://console.cloud.google.com/apis/credentials on your browser.
Create a Project (unless you already have one).
Click the + CREATE CREDENTIALS button.
Select the OAuth client ID option.
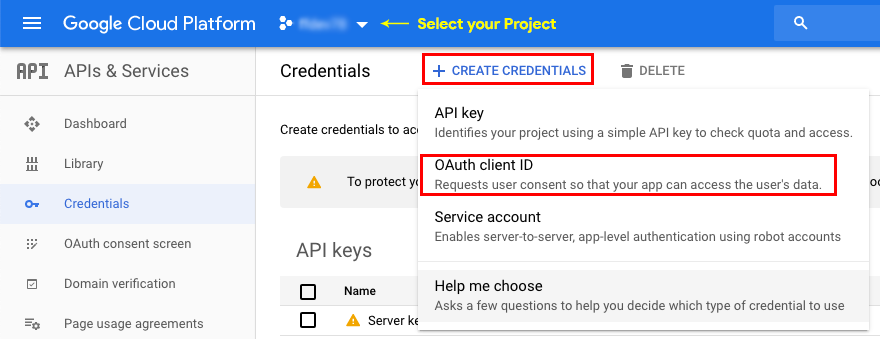
On the next page, select Web application, choose a name for your Client ID.
Click the + Add URI button and type your domain’s address (ex: https://yourdomain.com).
Lastly, click the Create button:

Once your Client ID has been created, you will be bale to copy it form a popup window.
Paste it in the $GOOGLE_SIGNIN_KEY variable of the XServerSDK.php file.
$GOOGLE_SIGNIN_KEY = '191162618244-qmjf889os6jffa53d53el3dsk87...'; In case you’re using a database on XServer.app, then you must paste that key in the Settings -> Google Sign in Web Key option of your Database as well:

You’re done with the Google Sign In configurations.
Useful stuff
F.A.Q.
Should I buy the XServer API or create an account on XServer.app to make this template work?
The code of this app template is written using the XServer SDK for iOS – this is included in the project – so you must either buy the XServer API or create an account on XServer.app to make it work the way it is.
But, if you’re an experienced developer and want to implement a different backend in the code, you can still buy this app and do your own job, since the UI is already built, as you can see by the Screenshots section.
If I buy this app template, can I use for multiple projects?
No: in case you want to publish more than 1 application using this template, you must purchase a License/project you want to publish on the App Store.
Instead, if I buy the XServer REST API or subscribe for a paid Plan on XServer.app, can I use the XServer backend for different projects/apps than this one?
Yes, that’s an API and you can use it in any other application or project.
What kind of support is offered?
Free support is offered in case of bugs encountered in the original template, either in the code or the UI design.
In case you have edited the code - and so created bugs because of your editing - I may apply some fee to fix your bugs by a remote connection through AnyDesk, or by you sending me your source code for verification.
I’ve performed all configurations mentioned in this Guide, but something is wrong. What should I do?
• Check if you have SSL enabled in your hosting provider’s website
• Check if you’re using either Chrome, Sarafi, Edge or Firefox browsers
• Check if you’ve set the correct website path/URL in the XServerSDK.php file
What hosting provider is best?
Based on my experience and tests, GoDaddy or AWS Lightsail are the best VPS server providers. I am unable to guarantee you that the files of this template will properly work on other hosting providers.
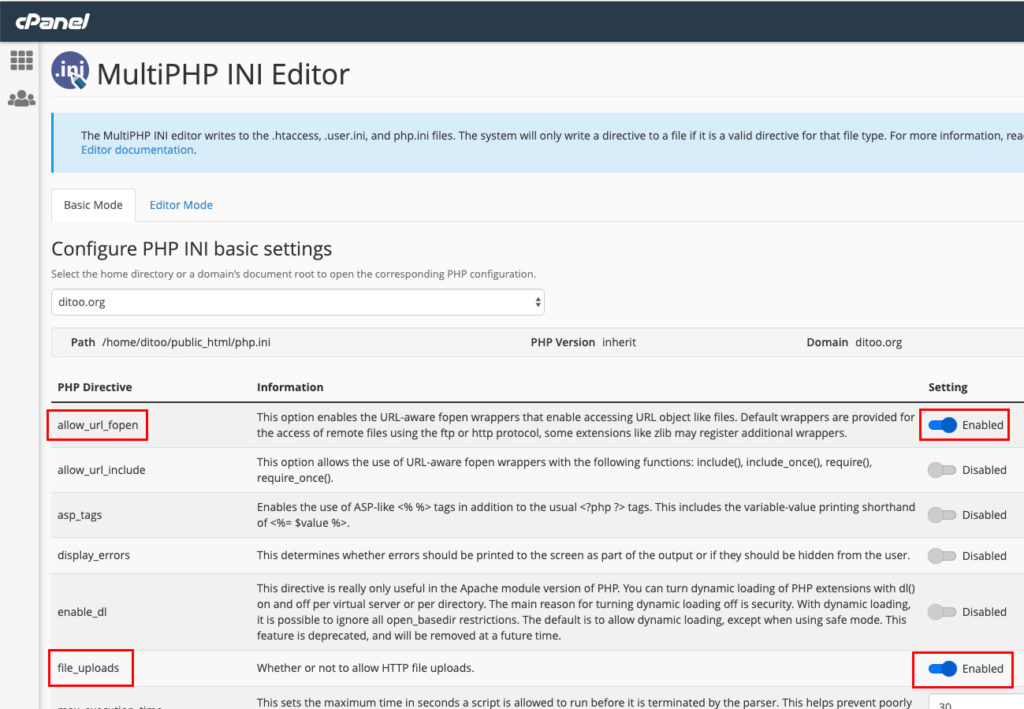
I’m getting an Internal Server error (500) while trying to save an item with an image attached
Enter the MultiPHP INI Editor form your cPanel and enable the following options:
5 thoughts on “Bazaar | Web PHP Social Listings/Classifieds Shopping Template [XServer]”
Comments are closed.