Introduction
Please carefully read this guide in order to fully configure this template, and remember to test it on a Real Device - the iOS Simulator may fail or not work properly.
Quick Start
You may just run this app on your own device via Xcode and play with it, it will work.
Anyway you need to customize this app into your own version, so just keep reading this guide.
General
Xcode
This template has a native Apple Swift code, so you can edit it only with Xcode running on a Mac computer. If you don’t have it, download it for free on the Mac App Store.
PLEASE NOTE that you’ll need the latest official version of Xcode, NO BETAS, because Betas are always buggy and never work properly.
App Name and Bundle ID
You must change the Display Name and Bundle Identifier into the new ones in the General tab in Xcode:
Archive App for App Store Publishing
Once your app is ready to be submitted to the App Store for review, you need to Archive your Xcode project.
Click on Product and select Archive. Xcode will archive your project and automatically open the Organizer window, where you’ll find a button to submit your binary to your App Store Connect account.

Reskin the UI design of the app
This project has a Storyboard file called Main.storyboard and you can find it in the list of file that is shown in left-side panel of the Xcode window.
You can edit all the UI elements of this app from the Storyboard, Colors, Fonts, Buttons, Views positions, etc.
The strings of the Alert Controllers are located in the code, so they can be edited only in the .swift files.
The images are stores into the Assets.xcassets folder.
Configurations
The Configurations.swift file
Open this file in Xcode and keep reading this guide, you’ll have to perform some edits in this file in order to get your template ready to run:
App Name
Replace this string with the new name you want to give to this app:
let APP_NAME = "Magic 8 Ball"AdMob Ads
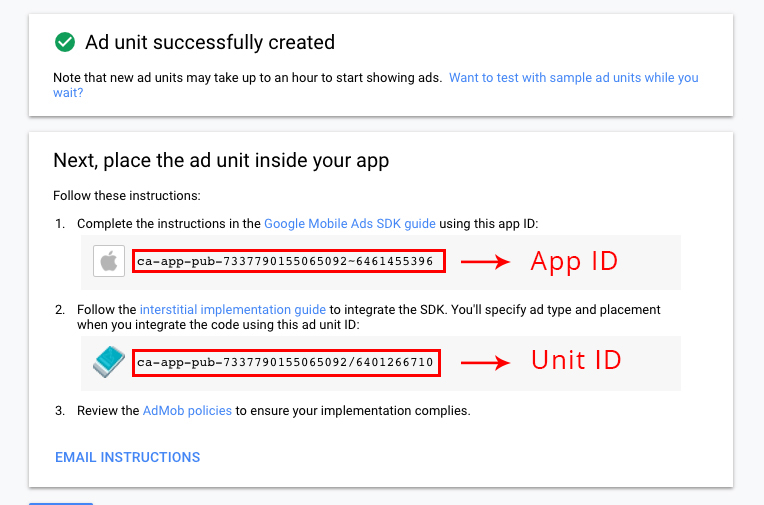
Replace the string of the variable below with your own Banner Unit ID - you have to create such Unit ID on apps.admob.com, just follow the instructions on the AdMob’s website in case you don’t know how to generate a Unit ID:
let ADMOB_BANNER_UNIT_ID = "ca-app-pub-3940256099942544/6300978111"You also have to replace the string into Info.plist with your own App ID:

You can get both App ID and Unit ID strings from your AdMob Unit page, after creating it:
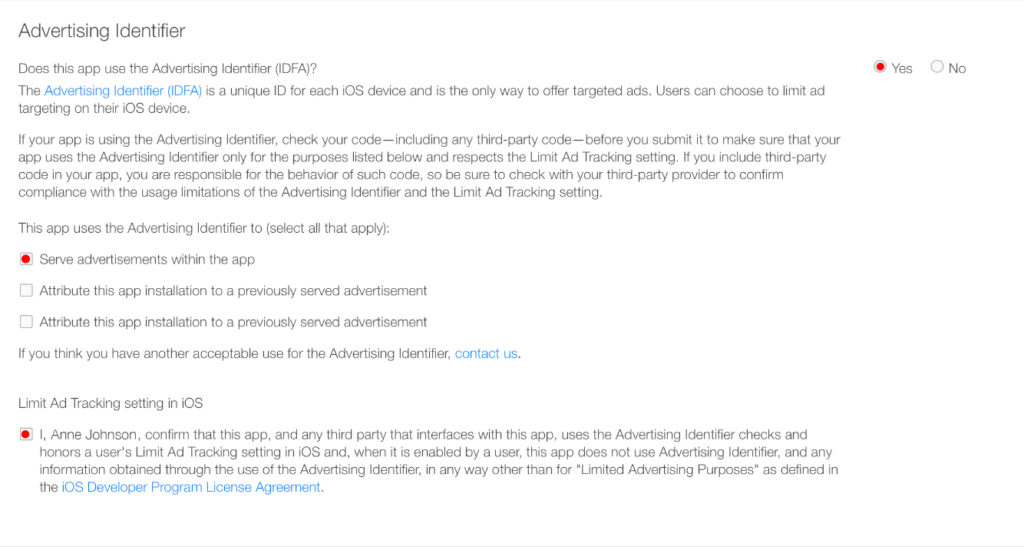
Sometimes Apple reviewers reject apps because of Ads, the reason why is not clear yet, but a new submission on the App Store will fix the problem and get your app approved - just in case you’ll get a rejection because of IDFA issue.
Anyway, after clicking the Submit For Review button on the App Store Connect page of your application, you’ll get something that looks like the picture below. Mark the options shown below and everything should go smoothly on the next review you’ll get of your app:
Custom Colors
You can edit the HEX values of the following variables as you wish, change the numbers before # symbol. The main color of the app and some UI will be affected by your change:
let MAIN_COLOR = hexValue(hex: "#0e0e0e") PLEASE NOTE that NOT all Views in the app will change accordingly to the new RGB values you’ve set in the above variable, you will still need to adjust some colors in some Controllers in the Storyboard.
Custom fonts
This App uses some custom font, which is stored in the Fonts folder.
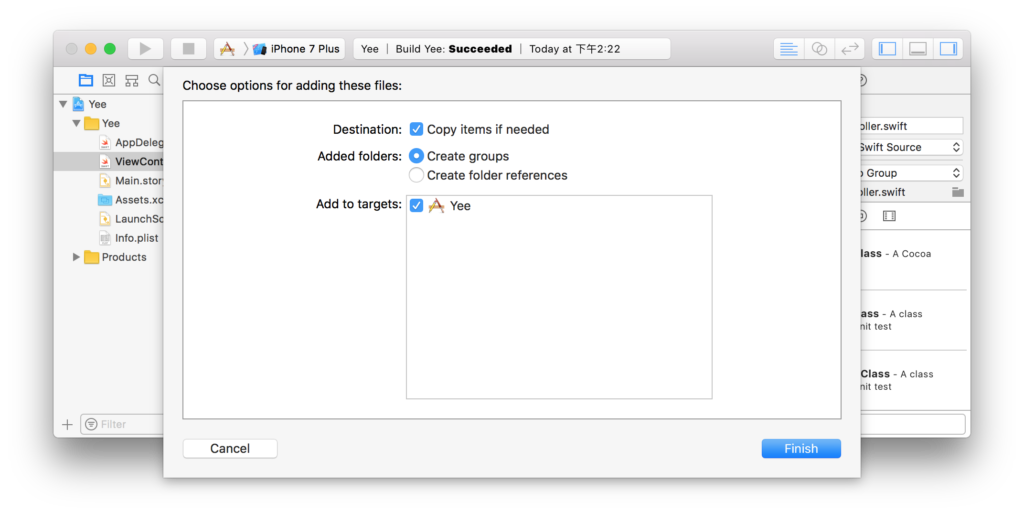
In case you want to add a new font, you have to first drag your .ttf or .otf font file into the left-side panel in Xcode and click the Finish button in the popup that will show up:
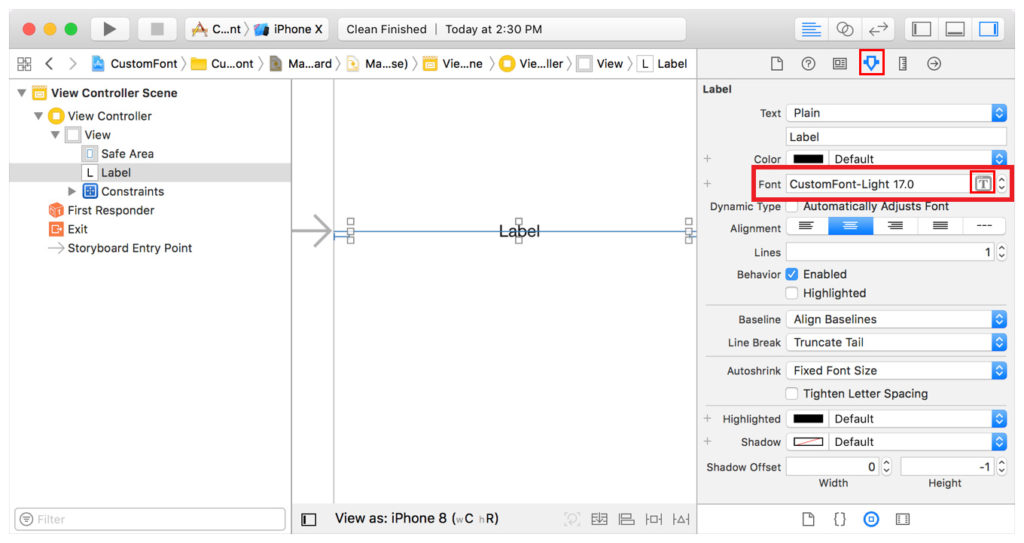
Then select the Label, Button, TextFiled or textView you want to change font to, click the [T] icon on the right-side Attributes inspector panel and select the font you want in the dropdown list:
App Store link
You have to get the ID of your app from the App Store Connect page of your application - you can get it while preparing it for Review. Replace XXXXXXXXXX with your own App ID (get it on https://appstoreconnect.apple.com) :
let APP_STORE_LINK = "http://itunes.apple.com/app/id" + "XXXXXXXXXX"Number of background images
The variable below indicates the number of images stored into the BACKGROUNDS fodler in the Xcode project. All of their names have a prefix as bkg. Currently, there are 8 images, so here’s the variable:
let BACKGROUNDS_NUMBER = 8 If you want to add one more background image, follow these simple steps:
- Get or create a JPG image, at least
1024x1024px - Name it progressively - in this case, its name must be
bkg8.jpg, because the last image in the project is calledbkg7.jpg - Drag it from your computer to the BACKGROUNDS folder in XCode
- Select the options as shown below, and click the Finish button:
- Update the
BACKGROUNDS_NUMBERvalue - in this case, 9. - Done.
Repeat the steps above to add other images, just always remember to name your JPG files progressively - so, if you now want to add another image, its name should be bkg9.jpg, and so on for other images.
Languages and Translations arrays
The following array is a list of available languages.
let languagesArray = [
     "en__English",
     "fr__French",
     "de__German",
     "it__Italian",
     "es__Spanish",
]
If you scroll down, you can also see other arrays - like answers_en, alternative_answers_en, funny_answers_en, etc.
The app needs all those arrays to handle multi-language data.
How to add a language
Follow these steps to add a language to the app:
- Add a language name with its 2-digit code in the
languagesArray, let’s take Finnish as an example:
let languagesArray = [
    •••
    "es__Spanish",
    "fi__Finnish", // <-- NEW LANGUAGE ADDED
] - As you can see by the example above, you type the 2-digit language code (fi), followed by 2 underscores (__), followed by the language name (Finnish). This syntax is important, you must follow it while adding languages in order for the app to work properly.
- Copy the whole
answers_en,alternative_answers_enandfunny_answers_enarrays, and paste them right above this comment:
// ------------------------------------------------
// MARK: - GLOBAL VARIABLES
// ------------------------------------------------ - Rename those arrays by replacing
enwithfi, like this:answers_fi,alternative_answers_fiandfunny_answers_fi - Translate all their string items into Finnish
- After that, copy the whole
translations_enarray and paste it right above theGLOBAL VARIABLEScomment - like you did for the other arrays - Rename that array by replacing
enintofi, like this:translations_fi - Translate all its items into Finnish
- When you’re done, enter the
Home.swiftfile and scroll down to the bottom, until you find thesetTranslations()function - Copy the whole
"en"case:
// English
case "en":
             if selectedResponses == 0 { localAnswersArr = answers_en
             } else if selectedResponses == 1 { localAnswersArr = alternative_answers_en
             } else if selectedResponses == 2 { localAnswersArr = funny_answers_en }

             answerLabel.text = translations_en[0]
             infoLabel.text = translations_en[2]
             changeLanguageMess = translations_en[3]
             cancelStr = translations_en[4]
             selectOptionStr = translations_en[5]
             achievementsStr = translations_en[6]
             changeBkgStr = translations_en[7]
             removeBkgStr = translations_en[8]
             shareStr = translations_en[14]
             sharingMessage = translations_en[15]
break - Paste those lines of code right above this line, inside the switch statement:
default: break - Now replace all
enintofi, make that code look like this:
// Finnish
case "fi":
             if selectedResponses == 0 { localAnswersArr = answers_fi
             } else if selectedResponses == 1 { localAnswersArr = alternative_answers_fi
             } else if selectedResponses == 2 { localAnswersArr = funny_answers_fi }

             answerLabel.text = translations_fi[0]
             infoLabel.text = translations_fi[2]
             changeLanguageMess = translations_fi[3]
             cancelStr = translations_fi[4]
             selectOptionStr = translations_fi[5]
             achievementsStr = translations_fi[6]
             changeBkgStr = translations_fi[7]
             removeBkgStr = translations_fi[8]
             shareStr = translations_fi[14]
             sharingMessage = translations_fi[15]
break - Now enter the
Responses.swiftfile, scroll down to thesetTranslations()function and copy the whole"en"case:
// English
case "en":
   titleLabel.text = translations_en[6]
   responsesArray.append(translations_en[11])
   responsesArray.append(translations_en[12])
   responsesArray.append(translations_en[13])
break - Paste those lines of code right above the
default:breakline - in the switch statement - Replace
enwithfi, make it look like this:
// Finnish
case "fi":
    titleLabel.text = translations_fi[6]
    responsesArray.append(translations_fi[11])
    responsesArray.append(translations_fi[12])
    responsesArray.append(translations_fi[13])
break - You’re finally done. Run the app and check it out, if you’ve done everything correctly, you’ll be bale to select the Finnish language and get all data into such language.
So, repeat the steps above to add other languages and their translations.
Utility Functions
Unless you’re an experienced developer, DO NOT EDIT the code below this comment, otherwise the app won’t work properly:
 // ------------------------------------------------
 // MARK: - UTILITY FUNCTIONS
 // ------------------------------------------------
F.A.Q.
What kind of support is offered?
Free support is offered in case of bugs encountered in the original template, either in the code or the UI design.
In case you have edited the code - and so created bugs because of your editing - I may apply some fee to fix your bugs by a remote connection through AnyDesk, or by you sending me your source code for verification.
Should I use Xcode to edit this template?
Yes, you must always use the latest stable official version of Xcode to edit this application.
Download the latest version on the Mac App Store from your Mac.
I’ve performed all configurations mentioned in this Guide, but something is wrong. What should I do?
• Double-check all your configurations, probably you have missed something.
• Always check the Console log in Xcode if the app crashes.
The Console log helps to debug your app, it’s really important.
How do I remove AdMob ads?
It’s super easy, just comment - or delete - the following line of code into GameBoard.swift file:
fireInterstitialAd()