Introduction
Please carefully read this guide in order to fully configure this template, and remember to test it on a Real Device - the Emulator may fail or not working properly.
An internet connection is required.
Quick Start
You may just run this app on your own device via Android Studio and play with it, it will work.
Anyway you need to customize this app into your own version, so just keep reading this guide.
General
Android Studio
This template has native Android Java/XML code so you can edit it only with Android Studio. If you don’t have it, download it for free.
PLEASE NOTE that you’ll need the latest official version of Android Studio, NO BETAS, because Betas are always buggy and never work properly.
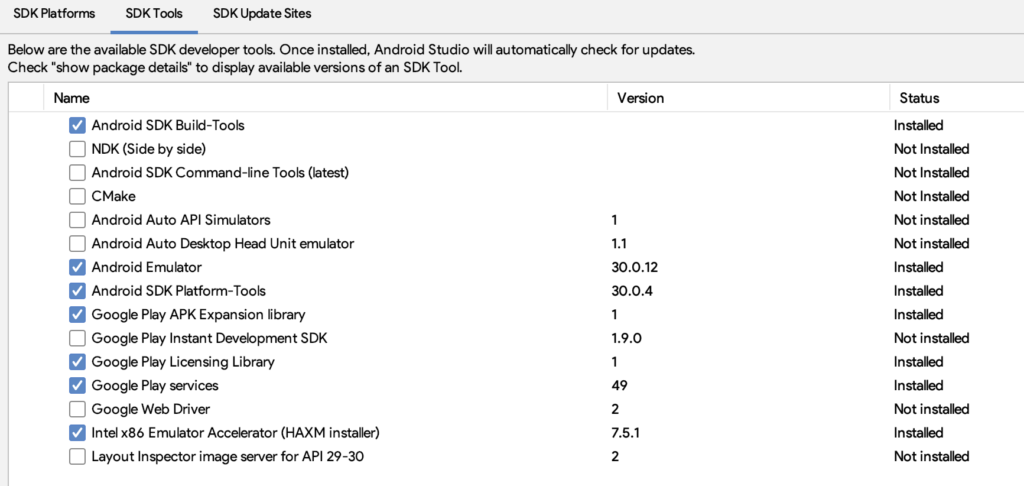
Please also make sure you have installed the following SDK Tools:
Change App Name
Enter the string.xml file - it’s into the res folder in Android Studio - and replace the App name with your new one in this line:
<string> string name="app_name"> TranslateIt </string>Change the Package Name
Follow these steps:
1- In the Project panel on the left side, click on the little gear icon.
2- Uncheck the Compact Empty Middle Packages option.

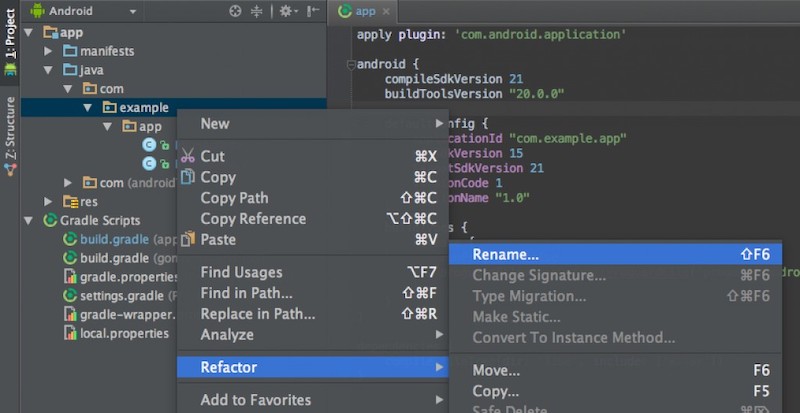
3 - Your package directory will get broken up into single directories, you will have to select each directory you want to rename and do these steps for each one:
• Right-click on it
• Select Refactor
• Click Rename
• In the pop-up dialog, click on Rename Package - DO NOT click Rename Directory!
• Enter a new name and click Refactor
• Android Studio will update the changes, it may take up to 30 seconds, usually less, just wait for AS to be done.
When renaming a com directory, Android Studio might show a warning. In this case, select Rename All.
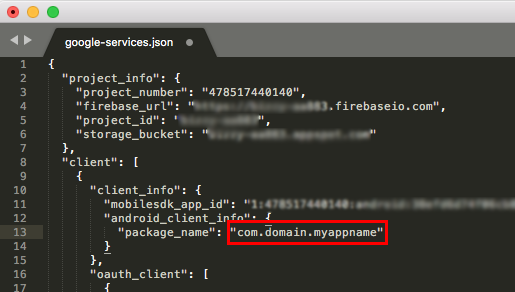
In case you have integrated Firebase in your project (for Firebase Cloud Messaging or other services), you must also change the "package_name" string into the google-services.json file accordingly to the new package name you’ve just set in Android Studio, as shown the the picture below.
NOTE: The google-services.json file is usually located in the app folder of your project folder.
4 - Open build.gradle in Android Studio and rename the applicationId string into your new full package name, then click Sync Now on the top-right corner, it’s usually highlighted by a yellow bar.
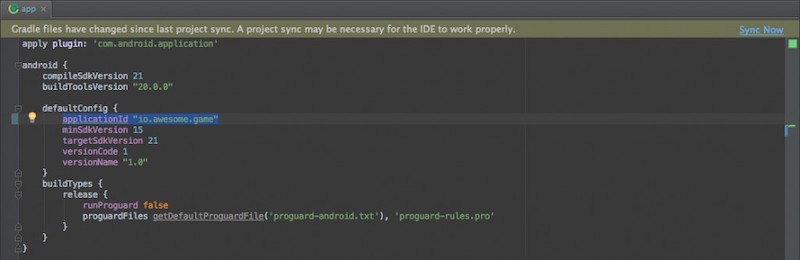
5 - Wait for the build.gradle sync to be done. if it doens’t print any error in the Android Studio console, then you’ve successfully renamed your package name.
Reskin the UI design of the app
This project has .xml files - stored into the res/layout folder - where you can edit all Views, Buttons texts, TextView’s strings, and all views attributes - position, font color, size, etc.
Alert messages are located in the code, they can be edited only in the .java files.
All images are stored in the drawable folders, where the app icons are stored into the mipmap folders.
Configurations
The strings-xml file
You can find this file into the res/values folder in Android Studio. Open this file and keep reading this guide, you’ll have to perform some edits in this file in order to get your template ready to run.
App Name
Replace the following name with the new one you want to give to this app in this line:
<string> string name="app_name"> TranslateIt </string>AdMob Ads
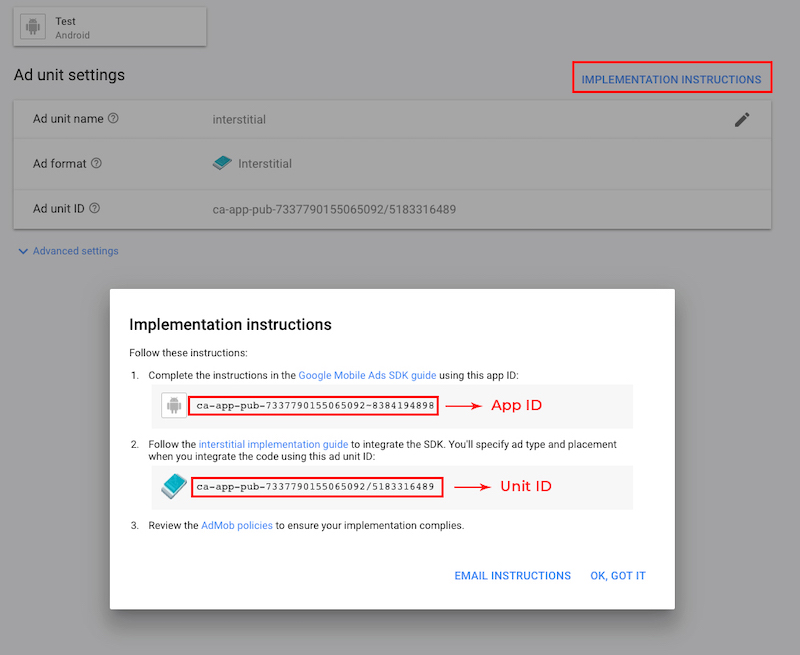
Replace the values of these variables with your own Interstitial Unit ID and App ID strings.
<string>name="ADMOB_INTERSTITIAL_UNIT_ID">ca-app-pub-3940256099942544/1033173712</string>
<string>name="ADMOB_APP_ID">ca-app-pub-3940256099942544~3347511713</string>
You have to create your Unit ID at apps.admob.com.
Follow the instructions on the AdMob’s website in case you don’t know how to generate an AdMob Unit ID.
The Configurations.java file
Open this file from Android Studio and keep reading this guide, you’ll have to perform some edits in this file in order to get your template ready to run.
Custom Colors
You can edit the HEX values of the following variables as you wish. The main color of the app and some other Views will be affected by your change:
public static String MAIN_COLOR = "#8344af";PLEASE NOTE that not all views will be affected by changing the HEX values above, you may still need to go through some XML file and adjust the colors on your own with the right-side Attributes panel.
Google Translate API Key
You must obtain your own Google Translate API Key from the Google Cloud Platform website, and replace the string of the variable below with your own one:
public static String GOOGLE_TRANSLATION_API_KEY = "AIzaSyDby9oQjWarxP9EGwA8q7NGD5-94xmAkj";Follow these steps to generate a Key and enable the Cloud Translate API (you must have an active Google Billing account with your credit card registered in it, and a created Cloud Platform’s Project):
1 - Log in into your Google account and go here: https://console.cloud.google.com/apis/dashboard
2 - Click the ENABLE APIS AND SERVICES button:
3 - Type “google translate” in the search box and select the Cloud Translation API box:
4 - Select the Neural Translation Model On line Predictions In Translatio V3 option, then click the MANAGE button:
5 - In the Cloud Translation API page - the one with the Overview tab - click the ENABLE API button, then click Credentials from the left menu:
6 - Click the Copy button next to the new generated Translation API Key, and use the copied string to replace the GOOGLE_TRANSLATION_API_KEY one in Configurations.java:
Done, you’re all set to allow the app to translate text!
List of Supported Languages
The following array is a list of all those languages that the Google Translate API can handle:
public static String[] languagesArray = {
    "af__Afrikaans",
    "sq__Albanian",
    "am__Amharic",
    "ar__Arabic",
    "hy__Armenian",
    "az__Azerbaijani",
    "eu__Basque",
    "be__Belarusian",
    "bn__Bengali",
    "bs__Bosnian",
    "bg__Bulgarian",
    "ca__Catalan",
    "ceb__Cebuano",
    "ny__Chichewa",
    "zh__Chinese (Simplified)",
    "zh-TW__Chinese (Traditional)",
    "co__Corsican",
    "hr__Croatian",
    "cs__Czech",
    "da__Danish",
    "nl__Dutch",
    "en__English",
    "eo__Esperanto",
    "et__Estonian",
    "tl__Filipino",
    "fi__Finnish",
    "fr__French",
    "fy__Frisian",
    "gl__Galician",
    "ka__Georgian",
    "de__German",
    "el__Greek",
    "gu__Gujarati",
    "ht__Haitian Creole",
    "ha__Hausa",
    "haw__Hawaiian",
    "iw__Hebrew",
    "hi__Hindi",
    "hmn__Hmong",
    "hu__Hungarian",
    "is__Icelandic",
    "ig__Igbo",
    "id__Indonesian",
    "ga__Irish",
    "it__Italian",
    "ja__Japanese",
    "jw__Javanese",
    "kn__Kannada",
    "kk__Kazakh",
    "km__Khmer",
    "ko__Korean",
    "ku__Kurdish (Kurmanji)",
    "ky__Kyrgyz",
    "lo__Lao",
    "la__Latin",
    "lv__Latvian",
    "lt__Lithuanian",
    "lb__Luxembourgish",
    "mk__Macedonian",
    "mg__Malagasy",
    "ms__Malay",
    "ml__Malayalam",
    "mt__Maltese",
    "mi__Maori",
    "mr__Marathi",
    "mn__Mongolian",
    "my__Myanmar (Burmese)",
    "ne__Nepali",
    "no__Norwegian",
    "ps__Pashto",
    "fa__Persian",
    "pl__Polish",
    "pt__Portuguese",
    "pa__Punjabi",
    "ro__Romanian",
    "ru__Russian",
    "sm__Samoan",
    "gd__Scots Gaelic",
    "sr__Serbian",
    "st__Sesotho",
    "sn__Shona",
    "sd__Sindhi",
    "si__Sinhala",
    "sk__Slovak",
    "sl__Slovenian",
    "so__Somali",
    "es__Spanish",
    "su__Sundanese",
    "sw__Swahili",
    "sv__Swedish",
    "tg__Tajik",
    "ta__Tamil",
    "te__Telugu",
    "th__Thai",
    "tr__Turkish",
    "uk__Ukrainian",
    "ur__Urdu",
    "uz__Uzbek",
    "vi__Vietnamese",
    "cy__Welsh",
    "xh__Xhosa",
    "yi__Yiddish",
    "yo__Yoruba",
    "zu__Zulu",
};
You may remove some languages from that array, if you want to, but you are NOT allowed to add any custom language code or name. Anyway, I suggest you to just leave that array as it is.
Custom fonts
This App uses some custom fonts for Buttons, TextViews ans EditTexts. The font files are stored into the app/src/main/assets/font folder and are declared in this line:
public static Typeface popBlack, popBlackItalic, popBold, popBoldItalic,
    popExtraBold, popExtraBoldItalic, popExtraLight, popExtraLightItalic, popItalic,
    popLight, popLightItalic, popMedium, popMediumItalic, popRegular, popSemibold, popSemiboldItalic,
    popThin, popThinItalic;
Such fonts are initialized into the onCreate() function as follows:
popBlack = Typeface.createFromAsset(getAssets(),"font/Poppins-Black.ttf");
popBlackItalic = Typeface.createFromAsset(getAssets(),"font/Poppins-BlackItalic.ttf");
popBold = Typeface.createFromAsset(getAssets(),"font/Poppins-Bold.ttf");
popBoldItalic = Typeface.createFromAsset(getAssets(),"font/Poppins-BoldItalic.ttf");
popExtraBold = Typeface.createFromAsset(getAssets(),"font/Poppins-ExtraBold.ttf");
popExtraBoldItalic = Typeface.createFromAsset(getAssets(),"font/Poppins-ExtraBoldItalic.ttf");
popExtraLight = Typeface.createFromAsset(getAssets(),"font/Poppins-ExtraLight.ttf");
popExtraLightItalic = Typeface.createFromAsset(getAssets(),"font/Poppins-ExtraLightItalic.ttf");
popItalic = Typeface.createFromAsset(getAssets(),"font/Poppins-Italic.ttf");
popLight = Typeface.createFromAsset(getAssets(),"font/Poppins-Light.ttf");
popLightItalic = Typeface.createFromAsset(getAssets(),"font/Poppins-LightItalic.ttf");
popMedium = Typeface.createFromAsset(getAssets(),"font/Poppins-Medium.ttf");
popMediumItalic = Typeface.createFromAsset(getAssets(),"font/Poppins-MediumItalic.ttf");
popRegular = Typeface.createFromAsset(getAssets(),"font/Poppins-Regular.ttf");
popSemibold = Typeface.createFromAsset(getAssets(),"font/Poppins-SemiBold.ttf");
popSemiboldItalic = Typeface.createFromAsset(getAssets(),"font/Poppins-SemiBoldItalic.ttf");
popThin = Typeface.createFromAsset(getAssets(),"font/Poppins-Thin.ttf");
popThinItalic = Typeface.createFromAsset(getAssets(),"font/Poppins-ThinItalic.ttf");
In case you want to add a new font, you have to first drag your .ttf or .otf font file into the app/src/main/assets/font folder, then you have to instantiate it at the end of the public static Typeface line that’s into the onCreate() function - let’s pretend you have a font file called Helvetica-Bold.ttf, you may add an instance called hBold (it’s just an example, name it as you wish since it’s a variable):
public static Typeface popBold, popSemibold, ... hBold;Lastly, import its path into the onCreate() function like the existing ones. Based on the font example above, your new line of code may look like this:
hBold = Typeface.createFromAsset(getAssets(),"font/helvetica-Bold.ttf");Utility Functions
Unless you are familiar with Android programming, you should leave the code of this section as it is since it includes useful functions to show alerts and perform other things in the app.
F.A.Q.
What kind of support is offered?
Free support is offered in case of bugs encountered in the original template, either in the code or the UI design.
In case you have edited the code - and so created bugs because of your editing - I may apply some fee to fix your bugs by a remote connection through AnyDesk, or by you sending me your source code for verification.
Should I use Android Studio to edit this template?
Yes, you must always use the latest stable official version of Android Studio to edit this application.
Download the latest version here: Download Android Studio
I’ve performed all configurations mentioned in this Guide, but something is wrong. What should I do?
• Double-check all your configurations, probably you have missed something.
• Always check the Logcat in Android Studio if the app crashes, usually the error messages are shown in red color.
The Logcat helps to debug your app, it’s really important
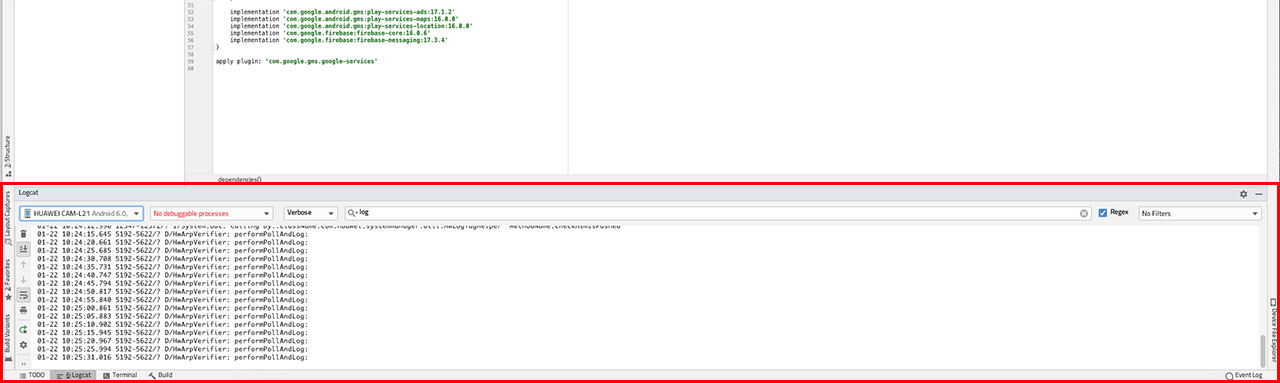
How do I remove AdMob ads?
It’s super easy, just open the Find in Path tool in Android Studio by clicking Edit -> Find -> Find in Path, and search for:
showAdMobInterstitialThe Find in Path window will show you a list of files where that string is located.
Just comment out (or delete) the following line of code in each file and the app will not show AdMob ads on next run:
showAdMobInterstitial(ctx);
2 thoughts on “TranslateIt | Android Speech and Text Translations Application”
Comments are closed.