Introduction
Please carefully read this guide in order to fully configure this template, and remember to test it on a Real Device - the Emulator may fail.
An internet connection is required.
Quick Start
BEFORE running this app on your own device via Android Studio and test it, you have to create a FREE account on back4app.com, and a Parse App.
, and replace the following strings with your Parse App’s App ID and Client Key in the Configurations.java file:
public static String PARSE_APP_ID =     "pwkmVrsiHTp2wN3q3UXUBiOwiE5C31atCq2CihPy"
public static String PARSE_CLIENT_KEY = "ugVWfJTY4azulDWoXmHVnkHkidlDzw6koSzrEVha"
Great, Your app is now connected to your own database!
You can now run the app 1 time only. After you’ll get an alert that will inform you about the cration of demo Classes and Rows, you can enter the Home.java file in Android Studio and:
Comment (or delete) this line:
createDemoClassAndRows();
Uncomment this line:
// callQuery();
If you now enter your Parse Dashboard, you’ll be able to see the RadioStations and News classes in it, along with their demo data, which is a sample to follow in order to add new Radio Stations and News. Keep reading this guide to see how to do that.
General
Android Studio
This template has native Android Java/XML code so you can edit it only with Android Studio. If you don’t have it, download it for free.
PLEASE NOTE that you’ll need the latest official version of Android Studio, NO BETAS, because Betas are always buggy and never work properly.
Change App Name
Enter the string.xml file – it’s into the res folder in Android Studio – and replace the App name with your new one in this line:
<string> string name="app_name"> TranslateIt </string>Change the Package Name
Follow these steps:
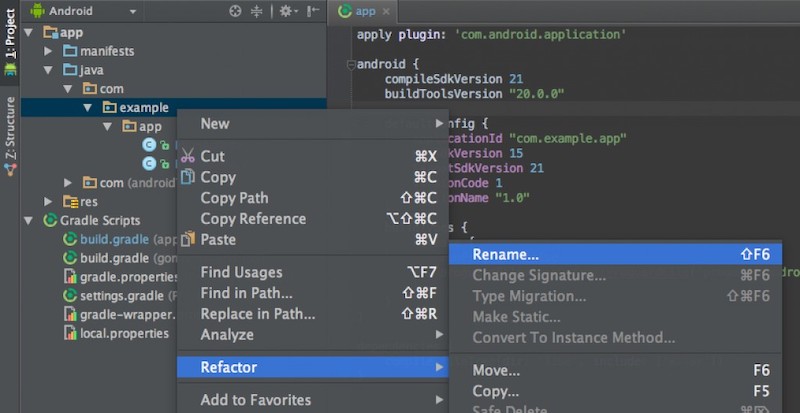
In the Project panel on the left side, click on the little gear icon.
Uncheck the Compact Empty Middle Packages option.

Your package directory will get broken up into single directories, you will have to select each directory you want to rename and do these steps for each one:
• Right-click on it
• Select Refactor
• Click Rename
• In the pop-up dialog, click on Rename Package – DO NOT click Rename Directory!
• Enter a new name and click Refactor
• Android Studio will update the changes, it may take up to 30 seconds, usually less, just wait for AS to be done.
When renaming a com directory, Android Studio might show a warning. In this case, select Rename All.
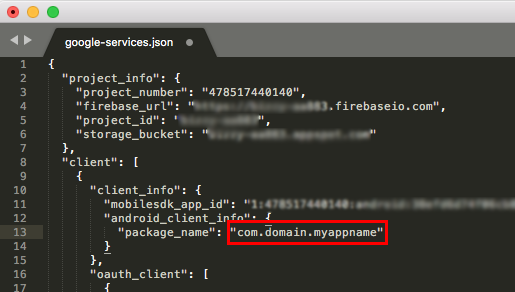
In case you have integrated Firebase in your project (for Firebase Cloud Messaging or other services), you must also change the "package_name" string into the google-services.json file accordingly to the new package name you’ve just set in Android Studio, as shown the the picture below.
NOTE: The google-services.json file is usually located in the app folder of your project folder.
Open build.gradle in Android Studio and rename the applicationId string into your new full package name, then click Sync Now on the top-right corner, it’s usually highlighted by a yellow bar.
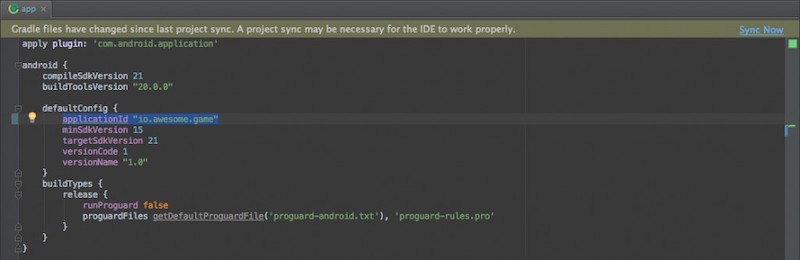
Wait for the build.gradle sync to be done. if it doens’t print any error in the Android Studio console, then you’ve successfully renamed your package name.
Reskin the UI design of the app
This project has .xml files – stored into the res/layout folder – where you can edit all Views, Buttons texts, TextView’s strings, and all Views attributes – position, font color, size, etc.
Alert messages are located in the code, they can be edited only in the .java files.
All images are stored in the drawable folders, where the app icons are stored into the mipmap folders.
Terms of Use and Privacy Policy
Open the tou.html file form the left-side panel’s list in Android Studio, and edit it accordingly to your own Terms of Service and Privacy Policy. Also, replace the APP_NAME words with the new name you assigned to your App.
Please also pay attention to this line:
"mailto:[email protected]">[email protected]
There are a few identical lines like that in the tou.html file, so you must replace [email protected] with a valid email address where people can contact you for any question, feedback or in case they want to delete their account.
Delete a User’s account upon request
Accordingly to GDPR Terms, you have 24 hours to delete an account after receiving a deletion request. In order for you to delete an account, you first need to identify the user’s row in the User class of your Parse Dashboard, keep a note of its objectId value, select that row and click Edit -> Delete this row.
Then, just search for that objectId‘s value you’ve previously noted in all the other Classes of your database, check out all the rows until you’ll find that objectId and delete it - this is in case it appears into some Array type columns.
Reported content
People are allowed to report inappropriate/offensive Comments.
So you should daily check your Parse Dashboard - the database - in order to see the column called reportedBy - in the Comments class - has some cell with an array of values (a string of the objectID of the reporting User, and take action for it asap.
You may delete the abusive Comments’ row from your database forever by selecting a row and click Edit -> Delete this row from the menu on the top-right corner of the Parse Dashboard.
Configurations
The strings-xml file
You can find this file into the res/values folder in Android Studio. Open this file and keep reading this guide, you’ll have to perform some edits in this file in order to get your template ready to run.
App Name
Replace the following name with the new one you want to give to this app in this line:
<string> string name="app_name"> XSRadio </string>AdMob Ads
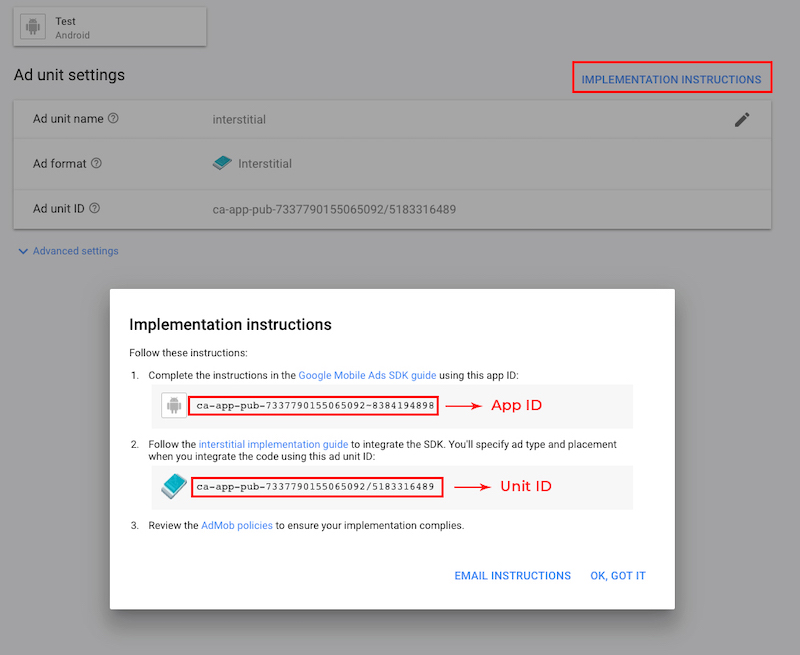
Replace the values of these variables with your own Interstitial Unit ID and App ID strings.
<string>name="ADMOB_INTERSTITIAL_UNIT_ID">ca-app-pub-3940256099942544/1033173712</string>
<string>name="ADMOB_APP_ID">ca-app-pub-3940256099942544~3347511713</string>
You have to create your Unit ID at apps.admob.com.
Follow the instructions on the AdMob’s website in case you don’t know how to generate an AdMob Unit ID.
The Configurations.java file
Open this file from Android Studio and keep reading this guide, you’ll have to perform some edits in this file in order to get your template ready to run.
Parse Server keys
As explained in the QuickStart paragraph, you must replace the strings of the 2 variables below with your own App Id and Client Key that you will get from the back4app website after creating your own Parse App:
public static String PARSE_APP_ID =     "pwkmVrsiHTp2wN3q3UXUBiOwiE5C31atCq2CihPy"
public static String PARSE_CLIENT_KEY = "ugVWfJTY4azulDWoXmHVnkHkidlDzw6koSzrEVha"
Custom Colors
You can edit the HEX values of the following variables as you wish, change the numbers before # symbol. The main color of the app and some UI will be affected by your change:
public static String MAIN_COLOR =  "#8344af";
public static String BLACK_COLOR =  "#121212";
PLEASE NOTE that NOT all Views in the app will change accordingly to the new RGB values you’ve set in the above variable, you will still need to adjust some colors in some Controllers in the Storyboard.
Custom fonts
This App uses some custom fonts for Buttons, TextViews ans EditTexts. The font files are stored into the app/src/main/assets/font folder and are declared in this line:
public static Typeface popBlack, popBlackItalic, popBold, popBoldItalic,
    popExtraBold, popExtraBoldItalic, popExtraLight, popExtraLightItalic, popItalic,
    popLight, popLightItalic, popMedium, popMediumItalic, popRegular, popSemibold, popSemiboldItalic,
    popThin, popThinItalic;
Such fonts are initialized into the onCreate() function as follows:
        popBlack = Typeface.createFromAsset(getAssets(),"font/Poppins-Black.ttf");
        popBlackItalic = Typeface.createFromAsset(getAssets(),"font/Poppins-BlackItalic.ttf");
        popBold = Typeface.createFromAsset(getAssets(),"font/Poppins-Bold.ttf");
        popBoldItalic = Typeface.createFromAsset(getAssets(),"font/Poppins-BoldItalic.ttf");
        popExtraBold = Typeface.createFromAsset(getAssets(),"font/Poppins-ExtraBold.ttf");
        popExtraBoldItalic = Typeface.createFromAsset(getAssets(),"font/Poppins-ExtraBoldItalic.ttf");
        popExtraLight = Typeface.createFromAsset(getAssets(),"font/Poppins-ExtraLight.ttf");
        popExtraLightItalic = Typeface.createFromAsset(getAssets(),"font/Poppins-ExtraLightItalic.ttf");
        popItalic = Typeface.createFromAsset(getAssets(),"font/Poppins-Italic.ttf");
        popLight = Typeface.createFromAsset(getAssets(),"font/Poppins-Light.ttf");
        popLightItalic = Typeface.createFromAsset(getAssets(),"font/Poppins-LightItalic.ttf");
        popMedium = Typeface.createFromAsset(getAssets(),"font/Poppins-Medium.ttf");
        popMediumItalic = Typeface.createFromAsset(getAssets(),"font/Poppins-MediumItalic.ttf");
        popRegular = Typeface.createFromAsset(getAssets(),"font/Poppins-Regular.ttf");
        popSemibold = Typeface.createFromAsset(getAssets(),"font/Poppins-SemiBold.ttf");
        popSemiboldItalic = Typeface.createFromAsset(getAssets(),"font/Poppins-SemiBoldItalic.ttf");
        popThin = Typeface.createFromAsset(getAssets(),"font/Poppins-Thin.ttf");
        popThinItalic = Typeface.createFromAsset(getAssets(),"font/Poppins-ThinItalic.ttf");
In case you want to add a new font, you have to first drag your .ttf or .otf font file into the app/src/main/assets/font folder, then you have to instantiate it at the end of the public static Typeface line that’s into the onCreate() function – let’s pretend you have a font file called Helvetica-Bold.ttf, you may add an instance called hBold (it’s just an example, name it as you wish since it’s a variable):
public static Typeface popBold, popSemibold, ... hBold;Lastly, import its path into the onCreate() function like the existing ones. Based on the font example above, your new line of code may look like this:
hBold = Typeface.createFromAsset(getAssets(),"font/helvetica-Bold.ttf");List of Genres
The following array contains a list of genres which are being used in this app.
You can edit them as you wish since they are just strings, but please note that every time you’ll change or add a genre name in this array, you must also change the name of its relative icon in the drawable folder in Android Studio accordingly:
public static String[] genresArray = {
        "Rock",
        "Metal",
        "Alternative",
        "Blues",
        "Classical",
        "Country",
        "Electronic",
        "Folk",
        "Jazz",
        "New Age",
        "Pop",
        "Rap",
        "Soundtracks",
        // YOU CAN ADD NEW GENRES HERE, MAX 2 WORDS
    };
So, for instance, let’s pretend you want to add a new music genre called Heavy Metal, you first have to add it as a string in the above array:
"Heavy Metal",Then create a new .png image and save it into the drawable folder by naming it as heavy_metal.png (it must be lowercase and, in case of a 2-word genre, put an underscore ( _ ) in between the 2 words).
You’re done, now the new genre you’ve added will be visible in the app!
Social URLs
You should edit the following strings by pasting your own social network URLs, accordingly to their names:
let FACEBOOK_URL = "https://facebook.com/xscoderapps"
let TWITTER_URL = "https://twitter.com/xscoder"
let INSTAGRAM_URL = "https://instagram.com/xscoder"
let YOUTUBE_URL = "https://www.youtube.com/channel/UCh5_HwfoBRBegneSkiuDHmA"
Support email address
You must replace the following string with a valid email address where you want people to contact you in case of questions, support or account deletion requests - accordingly to EU GDPR:
let SUPPORT_EMAIL_ADDRESS = [email protected]"Utility Functions
Unless you are familiar with Android programming, you should leave the code of this section as it is since it includes useful functions to show alerts and perform other things in the app.
Parse Dashboard Classes and column names
This section is a list of strings that the app calls to perform queries to the Parse Server database - aka Parse Dashboard - and it contains a few useful custom global variables and functions.
DO NOT EDIT those variables and instances unless you’re an experienced developer, otherwise, the app will not work properly.
Database
You should perform the following configurations BEFORE running the app!
The backend of this template is Parse Server hosted on back4app.com.
After performing the configurations mentioned below, you will run the app and see no content, the Intro screen will show up and you’ll be able to Sign Up in order to create a test account and start testing the app.
Due to the high-performace code of this template and the FREE back4app plan’s limits, you will be able to test this template for a while, but it may happen that you’ll receive an email from back4app telling you that you have reached the monthly plan’s limits and you should upgrade your plan.
I suggest you to do that and just subscribe for a Starter Plan - it’ only $4.99/month - so you will get more Database Storage and API requests/second/month than the FREE Plan. This paid subscription will also increase the loading speed of the app and can be enough for a good amount of users using your app. Check out the pricing table here
So, follow these steps to set up your own database:
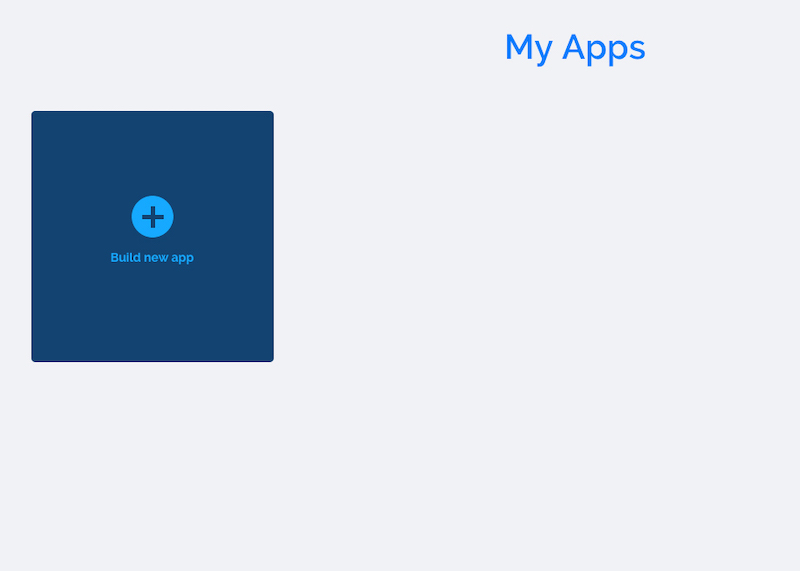
Unless you already have an account on back4app.com, create one - it’s FREE!
Enter My Apps and click on Build new app:
Type your App name and click CREATE:
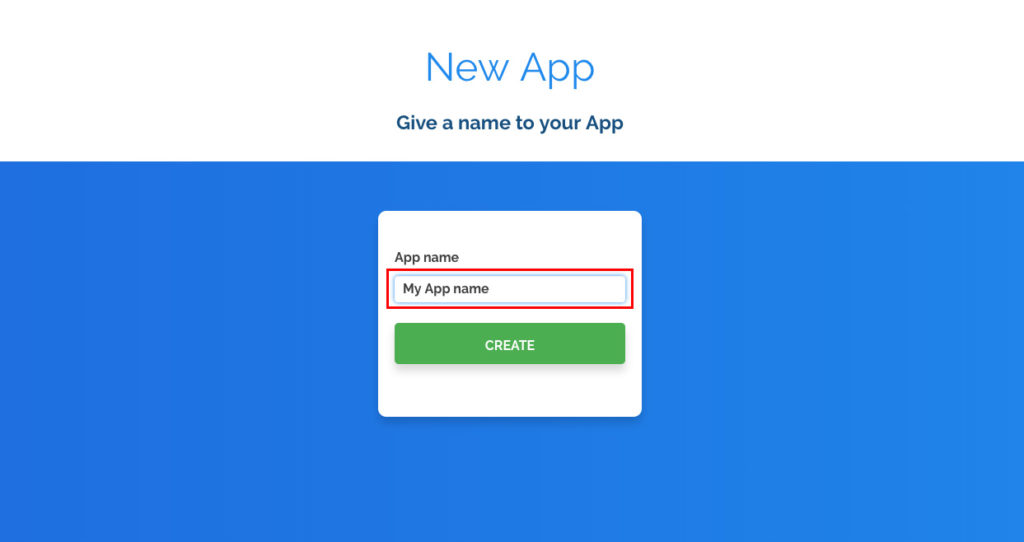
Wait for the website to create your app - it’ll take just a few seconds - then you’ll be redirected to the Dashboard (the database interface, which looks like an Excel file):
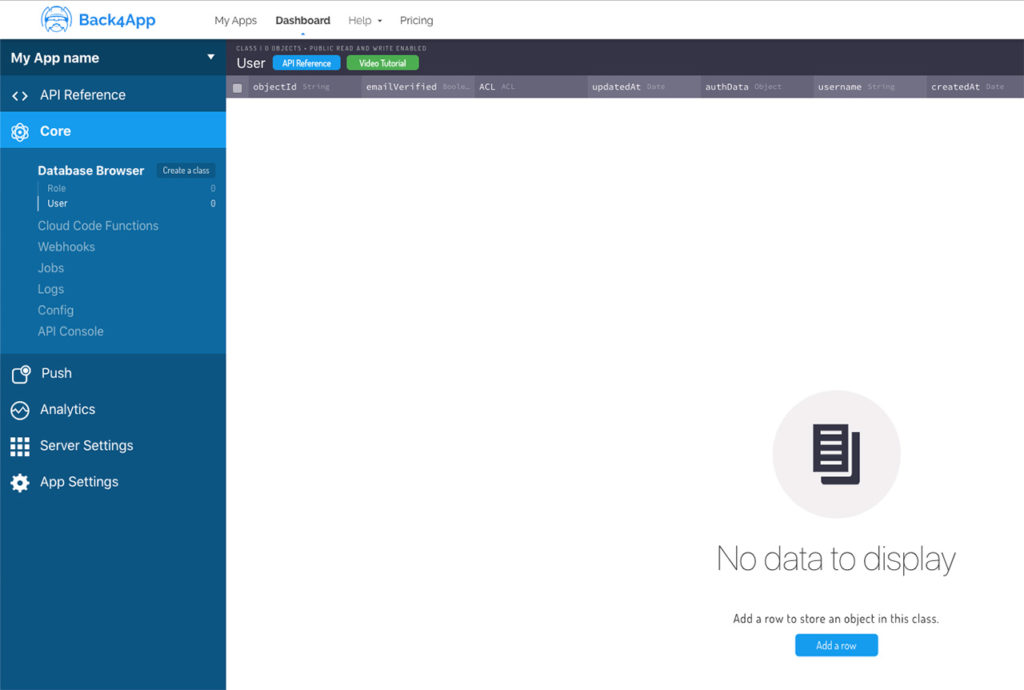
You’ll see it empty, but don’t worry, it’ll get data while you’ll start using your template.
Click on Server Settings from the left side menu:

Click on SETTINGS in the Core Settings box:

In the following page, you’ll have to copy the App Id and Client Key, and replace the strings into Configurations.java - as mentioned in the QuickStart paragraph:

public static String PARSE_APP_ID = "pwkmVrsiHTp2wN3q3UXUBiOwiE5C31atCq2CihPy"
public static String PARSE_CLIENT_KEY = "ugVWfJTY4azulDWoXmHVnkHkidlDzw6koSzrEVha"
Good job, your app is now connected to your own database.
Click the BACK button on the bottom of the page to go back to your App Dashboard, then click SETTINGS in the Cloud Code box:
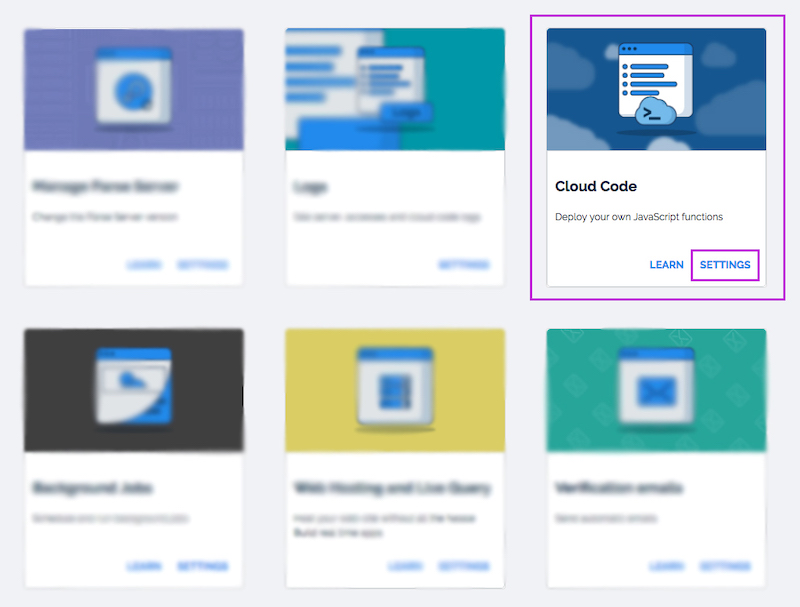
Click on + ADD and navigate to the folder you’ve downloaded from codecanyon in order to upload the main.js file to back4app.
Once main.js has been uploaded in this section, you can check it out by simply clicking its name from the cloud directory - if you can see its code in the blue area on the right side, it means the upload has been successful.
Click the DEPLOY button and wait for a success alert, then go back to your App Dashboard by clicking Server Settings from the left side menu.
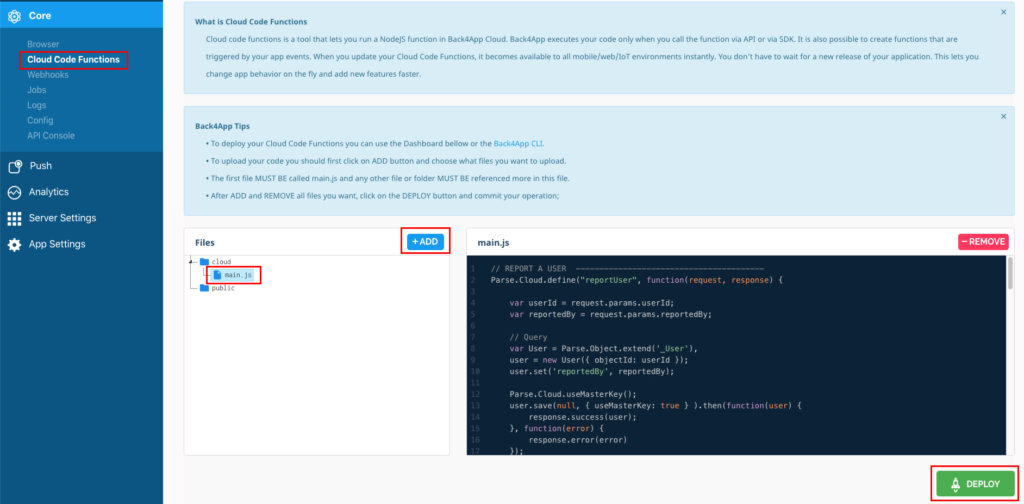
The main.js is a Javascript file that is absolutely useful for this app, since it allows it to perform some custom functions, so don’t forget to upload it into the Clod Code section 😉
Now, you can do what’s mentioned at the beginning of this guide, so run the app 1 time only, wait for the alert and comment (or delete) this line into Home.java:
createDemoClassAndRows();
Then uncomment this line:
callQuery();
You can now enter your Parse Dashboard again and see the RadioStations and News classes with their demo data.
Insert Radio Stations in the database
Watch this video to learn how to insert new Radio Stations into your database:
Insert News in the database
Follow these steps to insert news into the News class of your Parse Dashboard (the database):
Click the Add Row button to create a new empty row:
You can enter cells by double-clicking into them. So start from the cell of the title column and type the title of your news.
Enter the cell of the text column and type the text of your news.
TIP: If you want to create line spaces between paragraphs, hold the Shift key and press Enter twice, it’ll create a space between your previous paragraph.
Double-click on the cell of the image column and click Upload file to upload your news image (it should be maximum 600px in width, not exceeding the 1MB of file size).
In the cell of the comments column, you must type 0, otherwise the app will crash.
IMPORTANT: do not leave any empty cell, otherwise the app will crash
Repeat the steps above for any new News you want to add in the database.
The power of Parse Server is that you do not have to manually create tables and columns in the database - like you would have to do in MySQL - because the SDK will automatically create Classes and columns in your Parse Dashboard while using the template!
In case you want to use a custom CMS admin panel to manage your database instead of the Parse Dashboard, watch this video to see how to create a FREE FOREVER Admin panel on Adminca.com for your Parse App:
Facebook login
Enter your Facebook Developer page at https://developers.facebook.com/apps/
Click + Add a New App button
Type the name of your app and your contact email address in the popup window that just showed up.

Click the Create App ID button and pass the Security check that Facebook will prompt out.
After that, the browser will show your Apps Dashboard.
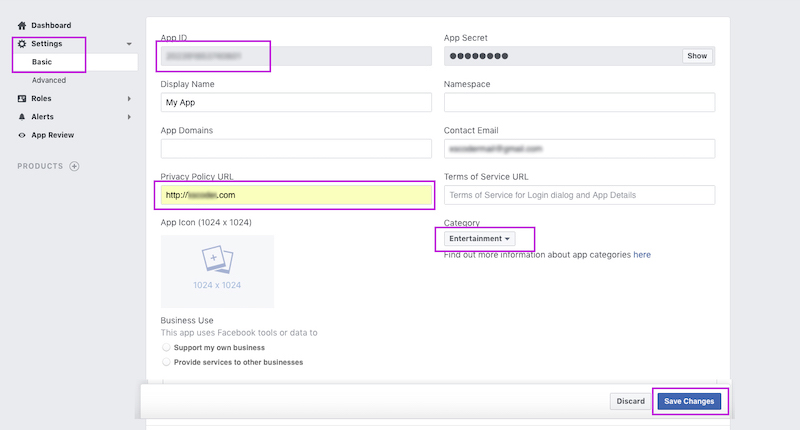
Click on Settings -> Basic in the left-side menu.
In the Privacy Policy URL type your website’s URL.
If you don’t have any Privacy policy page loaded in your own server or website, don’t worry about it, you may either create one and upload it to a free hosting server like 000webhost.com or just place any URL, even “http://example.com/“, is ok, Facebook staff doesn’t make ay check for it yet. of course it would be good to create and upload a Privacy Policy HTML or PHP page someday in your own server and change that URL with the one of your page 🙂
Now select a Category, upload a 1024x1024px or 512x512px app icon image and click Save Changes on the bottom of the page.
Ignore the Business Use and Data Protection Officer Contact Information sections in case you’re not doing any business in Europe (this is intended for companies, not individual developers or people).
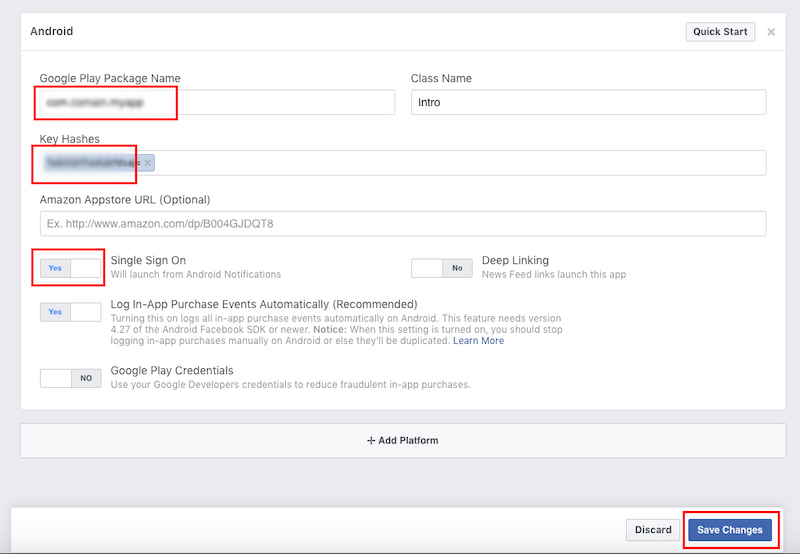
Scroll down and click + Add Platform, then select Android:

Copy the package name you have set before in Android Studio and paste it in the Google Play Package Name box of the Android section.
Type Intro in the Class Name box.
Go back to Android Studio and run your app. You have to be logged out the app in order to enter the Intro screen and check your Logcat. You should see a message like this:
I/log-: HASH KEY TO COPY: U05jRHlAyYvJZCAuPfKI+/l6fzQ=You have to copy only the U05jRHlAyYvJZCAuPfKI+/l6fzQ= part and paste it into the Key Hashes box.
Lastly, switch Single Sign On option to Yes and click the Save Changes button on the bottom of the page.
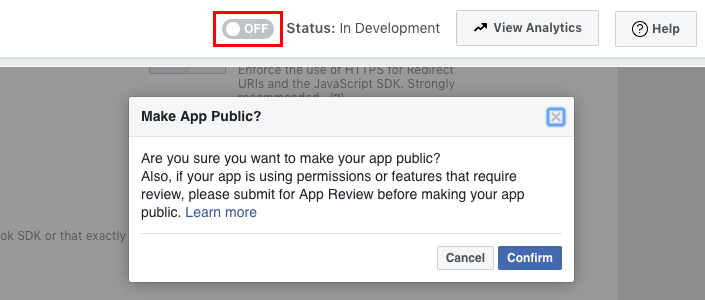
Click the OFF switch on the top-right corner of the page.
Click the Confirm button in the alert that shows up - you can ignore its message, the Facebook Login will still work in your template:
Now go back to your App Dashboard on back4app, scroll down and click SETTINGS in the Facebook Login box:
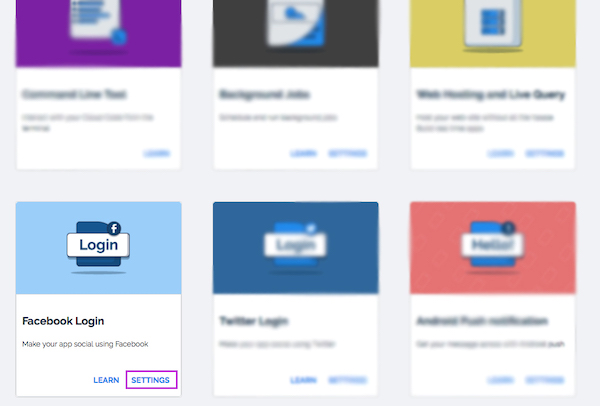
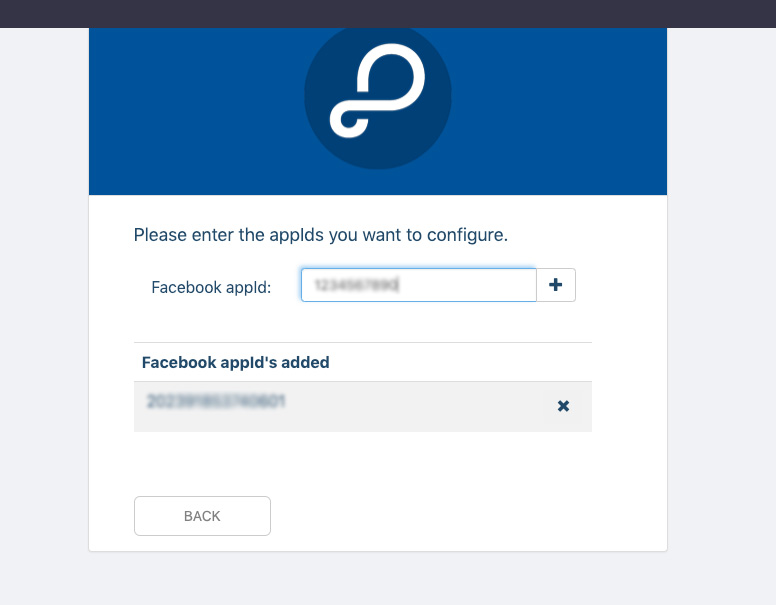
Paste your Facebook App ID in the text box and click the + button to add it to your Parse App.
Enter the strings.xml file in Android Studio - it’s inside the res/values folder - and replace the facebook_app_id value with your own Facebook App ID - you can copy it by clicking on the APP ID on the top of the screen:

Into strings.xml:
<string name="facebook_app_id">XXXXXXXXXXXXXXXX</string> Great, you’re done with the Facebook Login settings!
PLEASE NOTE that if you already bought the iOS verison of this template, you don’t need to create a new Facebook app.
Just add the Android platform to your existing Facebook App, perform the settings explained above and copy the same APP ID.
Push Notifications
Follow these steps to create a Firebase project and grab the GCM Sender ID and Server Key strings, in order for the app to send/receive Push Notifications:
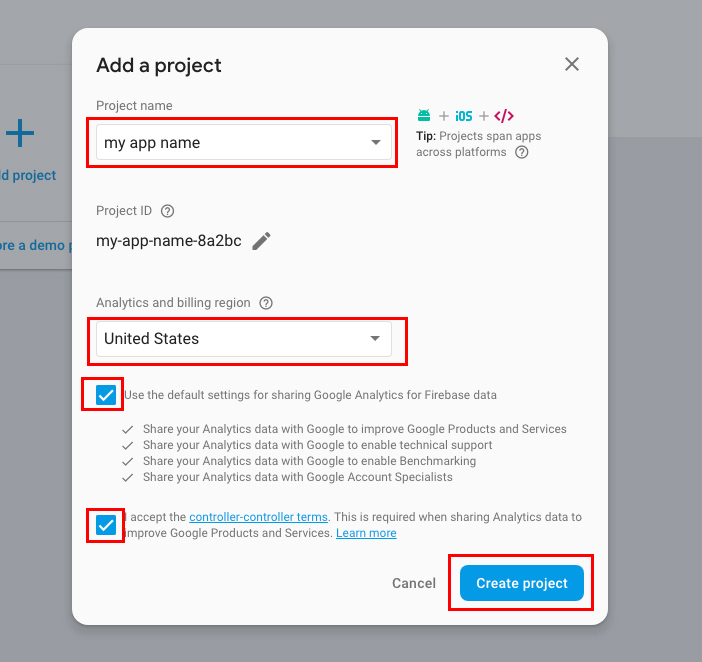
Login in to your Firebase account and click on + Add project

In the popup window that will show up, enter your app name.
Select the country where you live in.
Check the Use the default settings for sharing Google Analytics for Firebase data option.
Check the I accept the controller-controller terms option as well.
Then click Create project
When Firebase has created your project, click Continue.
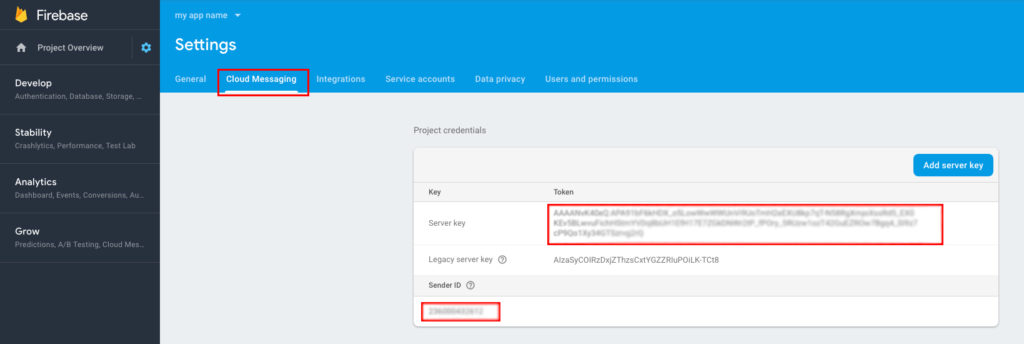
On the top-left corner of the page, next to Project Overview, click the gear icon and select Project settings from the menu.

In the Settings page, click the Cloud Messaging tab, here’s where you can copy the Sender ID and Server Key.
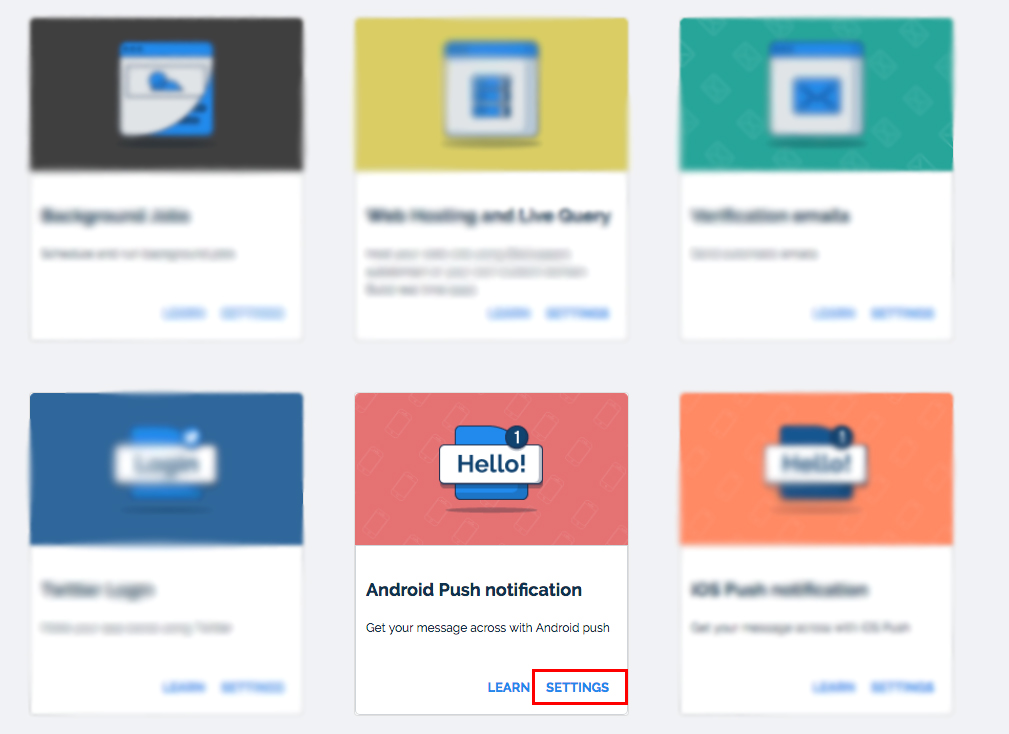
Enter your App Dashboard on back4app and click on SETTINGS in the Android Push notification box:
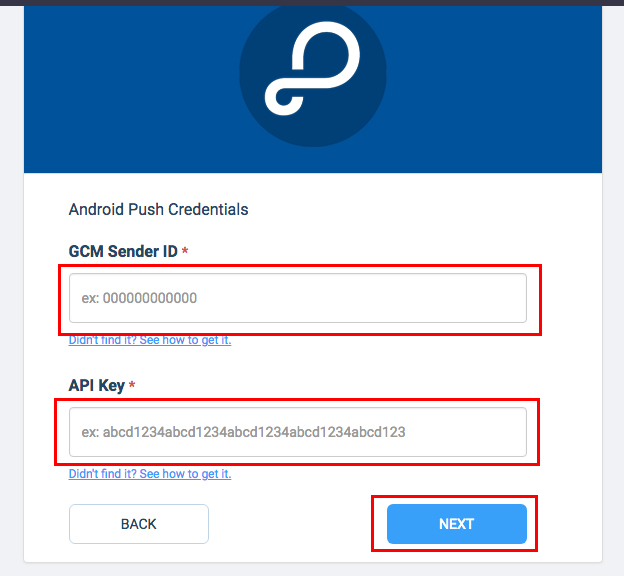
Click Edit, paste your Sender ID in the GCM Sender ID box and your Server key in the API key box.
Lastly click the Next button:

It’s now time to go back to your Android Studio project and open AndroidManifest.xml by selecting it from the files menu list on the left panel - it’s in the manifests folder.
You will see a few comments like this:
<!-- IMPORTANT: REPLACE "com.xscoder.appname" WITH YOUR OWN PACKAGE NAME -->Just do what they say, which means that you have to replace the original package name with your new one (I assume you already changed the package name, but in case you haven’t done that yet, do it now, then keep reading).
Then, you’ll have to replace the demo GCM Sender ID string with your new one from your Firebase project, so find that line with this comment:
<!-- IMPORTANT: Replace "191162618244" with your own GCM Sender Id. -->and just replace the Sender ID in this line:
android:value="id:191162618244"/>You must also replace the Sender ID into Home.java as well, so open that file, find the following code into the onStart() function and replace the Sender ID string:
installation.put("GCMSenderId", "191162618244");Send Push Notifications via the Push Console
Now you can send Push Notifications to all registered users via the Push console on back4app:
This is what users will get on their devices:
If you already signed up with some test users in your app - so you’ve ran the app before doing these Push Notifications configuration steps - then you will have to sign up as a couple of new test users and run the app again in order to test Push Notifications.
This is because the previous test Users you’ve created before have not been registered in the Installation Class in your Parse Dashboard. That’s the Parse Server’s Class that handles Push and it has to have the objectId of those Users who allowed Push Notifications permission on their devices at app startup.
Useful stuff
F.A.Q.
Parse Server hosted on back4app
Parse Server is a powerful JSON backend based on Node.js, and its hosted on back4app.com.
Click here to learn more about this backend
Can I host Parse Server on my own server?
You may do so, but please note that I do not provide support for it because it’s pretty complex to configure Push Notifications and Cloud Code jobs, that’s why my templates use back4app - it allows those setups to be made quickly and easily.
If you still want to try to host Parse Server on Heroku or your own server, you should refer to the official Parse Server Guide at parseplatform.org.
What kind of support is offered?
Free support is offered in case of bugs encountered in the original template, either in the code or the UI design.
In case you have edited the code - and so created bugs because of your editing - I may apply some fee to fix your bugs by a remote connection through AnyDesk, or by you sending me your source code for verification.
Should I use Android Studio to edit this template?
Yes, you must always use the latest stable official version of Android Studio to edit this application - NO Betas, they don’t work properly!
Download Android Studio
I’ve performed all configurations mentioned in this Guide, but something is wrong. What should I do?
• Double-check all your configurations, probably you have missed something.
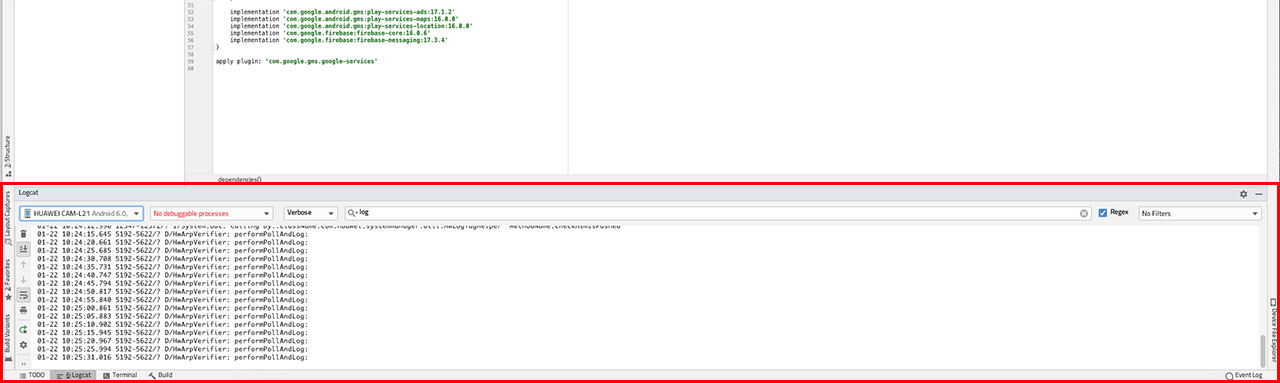
• Always check the Logcat in Android Studio if the app crashes, usually the error messages are shown in red color.
The Logcat helps to debug your app, it’s really important
How do I remove AdMob ads?
It’s super easy, just open the Find in Path tool in Android Studio by clicking Edit -> Find -> Find in Path, and search for:
showAdMobInterstitialThe Find in Path window will show you a list of files where that string is located.
Just comment out (or delete) the following line of code in each file and the app will not show AdMob ads on next run:
showAdMobInterstitial(ctx);